How To Create a Gallery
It's important that everyone is aware of how to create a gallery as we work to increase page views on our websites. I'll be using this post as an example of how to create one with step-by-step instructions.
1. Topic selection - It's important to create a topic that is shareable and engaging and should have the ability to have a minimum of 10 items (best practice but not a hard and fast rule)
2. Photo acquisition - It's always good to have your content organized so it's easy to complete the gallery creation process. You can use Getty images, stock images and personal images. Basically, whatever images you use for a regular post you can use for a gallery. The difference will be in steps involved in the upload process.
3. Begin your post - creating an engaging headline, all the basics apply here.
4. Introduction - before adding your gallery, have a primer for what they're about to read so they know what they're getting into regarding your post.
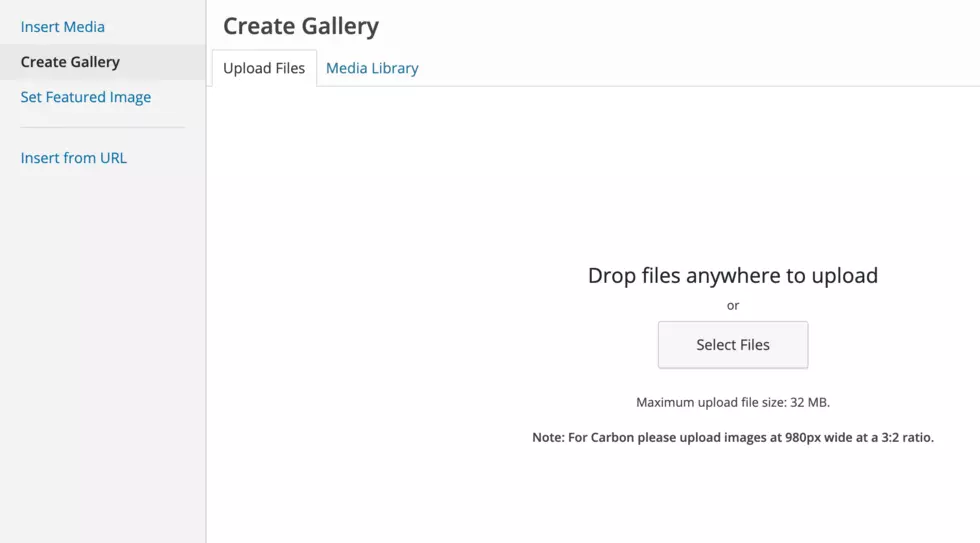
5. Photo Upload - Click on the Add Media button to get ready to upload all the images you want for your gallery.
6. Photo modification - Here's where the process differs. Instead of just uploading photos as usual, click on 'Create Gallery' on the left side of the upload page. This will open up a new upload tool that will let you add photos you upload to a gallery, then allow you to name your gallery as well as properly title your photos and add descriptions which will be the new body of your story.
7. Photo title and description - Now that you've uploaded your photos, you'll need to select each photo to title them and add a description (as well as proper captioning like you normally would). Your title will be the 'headline of the image', and the description will be the body below the image that adds context to the photo. Repeat for all photos in your gallery. If you're creating a countdown/count-up post, use the number as part of your title as in the below example.
8. Gallery Creation - Select all the photos you have modified and click the Create Gallery button on the bottom right corner of the window. You will be allowed to rearrange the photos as well as title the gallery (which will appear at the top of the gallery). If you're creating a list-style gallery (one that doesn't open up into a pop-up window that forces you to click to see the next photos), select the option style=list. If you want the 'click next to see another photo (especially if you're asking a question on one photo and providing an answer on the next) select style=fullscreen. Then insert your gallery into your post.
Once you're done, send me a link to your post so I can grab the gallery code to store in a spreadsheet for future use.
5 Netflix Titles With New Orleans In A Starring Role
More From 97.3 The Dawg